Tuesday, September 18, 2012

Glitter, Puffy Paint, and Pennies


I had a pleasant surprise yesterday in the form of my niece, who stopped by to do some crafting with me.  She brought a cap and headband that she wanted to "glitterize" and puffy paint Class of 2013. 

We started withe the headband which worked great.  That spray adhesive really sticks!  We found that it worked better if we pressed the glitter on thickly, then shook off the excess. 

Time to attack the cap.  We did one layer of puffy paint, which takes 4 hours to dry, according to the label.  (Much faster if you put a small fan set on low directly on it.)  This gave us plenty of time to catch up and work on jewelry for my trunk show and for her to do her homework. 


 A tip for those who like to plan and use resources sparingly . . . spray the item to be glitterized in an area separate from the area where you will be sprinkling the glitter.  We were sharp enough to think of putting something down to catch the excess for reuse, but we didn't think about the overspray of the adhesive getting on the paper.  So a lot of our excess glitter got stuck to the paper! 


She showed me a penny ring she had seen on Pinterest and asked if I could make one.  I had a box of old pennies at my bench, already sorted by date for experimenting with torch fired enamel. (Post-1982 pennies are zinc-coated copper, earlier ones are 95% copper.) I figured what the heck I could give it a try!

I started by using dead soft 16 ga sterling silver and cut the wire to a size 4.  I soldered the band, then popped it in the pickle (acid bath) to remove the fire scale from the torch.  Then, a good rinse under the faucet and a scrub with a wire brush, followed by some hammering for texture and I was ready to work with the penny.  My first attempt I bent it the wrong way - she wanted Lincoln's head on the back of the coin, and I bent it so it would be on front. 

The most difficult part was getting the fit right between the sterling band and the curve of the coin.  There can be no space between the two points to be soldered, so it had to be quite flush.  Tough to do on a curved surface!  I first heated the penny to glowing red with my torch to anneal (soften) the copper.  Then I used two sets of pliers to bend the coin to fit the curve of the band. I had the curve right but the raised design made it impossible to get a good seat between the two surfaces.  I used my Dremel to cut a channel in the back of the penny and it fit perfectly. 

The next challenge was getting the band to stay seated in the channel while I soldered.  I must have spent 15 minutes rigging up a system to get the correct pressure on the solder points. I recently saw a tutorial video where the jeweler said sometimes it takes longer to set something up than it does to perform the actual job.  This was certainly the case and well worth the effort in hindsight, as my solder joint was absolutely perfect on the first attempt! 

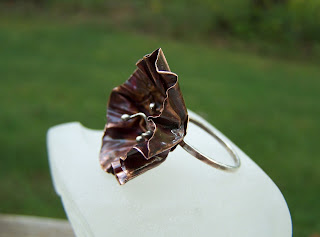
A quick quench and a trip to the pickle, then it was time for the tumbler, which I use to burnish and work harden my pieces.  I add a drop of Dawn dish soap and distilled water just covering the shot, then set it on the tumbler for 2 hours.  This produced the results you see above, sparkling and shiny.  I then added patina by dipping the entire ring in liver of sulfur, which turned the penny completely black.  I used my Dremel to buff the top to bring out the design on the coin and to bring the silver back up to a high polish.  Another trip to the sink to scrub off the black gunk from buffing, then a shot of hot air with the hair dryer to make sure it's fully dry.  Next I brush the entire ring with xylene to make sure that absolutely any trace residue is removed before sealing.  If the copper isn't sealed, it will react with the skin, producing an unsightly green mark wherever it meets a finger.  I use ProtectaClear by Everbrite which is simple to use and does an excellent job.  I used 2 coats, each applied 30 minutes apart, then bake it in the oven at 180°F for an hour.  This sets the seal immediately and prevents the optional 4-5 day wait required otherwise for it to cure.


Great fun and awesome results all the way around!


Tuesday, September 11, 2012

From Hawt Flashes to Hot Flashes: How the Smartass Sisters Became the Menopause Twins

I spent the morning with my Irish Twin sister, Bean.  She had an appointment with her OB/GYN, a follow-up from her hysterectomy six weeks ago.  We did the deed at the doc's office then headed to Michael's to kill some time before lunch.  I was in dire need of a replacement for the pair of chain nose pliers that snapped in my hands in the middle of working wire last week.  I also found some embossing folders and punches half price along with some scrapbooking scissors that will cut cool edges in sheet copper and make pretty bezels for setting stones. 

I was trying to remember the things I needed without looking at my list, believing that if I couldn't remember it, it must not be that important.  Bean said that she had forgotten to ask her doc about the instant menopause and hot flashes that came as a nice parting gift for playing the hysterectomy game.  She pointed out that that was really important and she had forgotten that, so my theory was bunk.  She's so smart like that . . . . 

We checked out and headed for lunch - first to Applebee's - but it was 10:45 and they didn't open until 11 am.  We spotted a Panera so we headed there, stopping to drool at the pastry counter before moving toward the ordering spot and on to the stuff we're supposed to eat *sigh*

Suddenly as if synchronized mechanisms in our brains had engaged, we both started sweating.  I'm not sure if they had the heat on, or had just turned of the AC since it was a gorgeous 65°F outside or what . . . but it was freakin HOT!  I said to Bean, fanning myself and reaching for a napkin, "Hot Flash".  She said, "No, it's too hot in here!!!"  With barely a word we moved as one for the door. And the cool.  It was completely understood that we absolutely positively would NOT be able to get through lunch in a place that hot.  She called it "old person" hot, like how old people want it warm because they're always cold. 

She said something about the 80's and I said how weird it was that people were now saying "vintage 90's" , but really it was 20 years ago.  It made me think of how different our hanging out together is now compared to 30 years ago.  We had game in those days and one of our favorite games I will code name Hawt Flashes because I am now a grandmother and probably shouldn't embarrass my kids or grandkids with that.  Trust me it was hilarious.  We called ourselves the Smartass Sisters, and I remember laughing so hard I thought I would pee.  Ahhhhhh . . . . Boone's.

But now that we've entered middle age *ahem-late-40's-cough-cough* we don't get a chance to play Hawt Flashes any more. (Which might be for the best . . . prolly not so hawt any more *sigh*)  So we have decided to call ourselves the Menopause Twins instead.  From Hawt Flashes to Hot Flashes, there's no one I'd rather flash with than my Bean. ♥

SO while all that is floating around in my head . . . lookee what I came up with!  Thanks to our Menopause Twins Day Out.  


Sunday, September 9, 2012

Torch Fired Enamel: Fun with a Blow Torch!!

I have long believed that women and power tools go together, but I never expected to fall in love with a blow torch! *cue the theme from Flashdance please*

I bought a huge lot of enameling supplies on eBay and originally thought I had to wait for Christmas for a kiln.  But noooo!!  Thanks to the joys of YouTube, I discovered that it can be done with a torch!  So hubby was a sweetheart and brought home a cute little blue one with an auto-click ignition, which sat in the package for over a week (I was still intimidated).  I started with my micro torch, but kept having to refill the butane more often than I preferred, so yesterday I tore open the package a read the instructions. Easy Peasy!!

It's so much fun I felt like a little kid with a new toy.  I resisted the urge to take it to bed with me . . . I am somewhat grown up after all LOL

Here are my first attempts:

I drew lines with a toothpick to mimic the shell

In the quench - he's so iridescent!


I liked how the lines looked, but I wanted to try some small pieces of glass too.

My own pattern for the pansy, requested by my sister.

Sprinkled with ground glass powder in a pale blue.

Finished products!!